Thursday, December 18, 2014

Gear to Capture Stunning Wedding Videos

New cameras come out every year, but any DSLR made since the Canon 7D released in 2009 or the Canon 5D Mark II from 2008 can capture amazing cinematic video when paired with the right lenses.

Invest the most in your lenses

Cameras come and go, but your lenses will be capturing incredible footage for years to come.  Spend money on the fastest (widest aperture) lenses you can afford. You won't regret it, and every good lens you purchase will benefit your projects in different ways.

Some great lenses for video:

Fast Standard lens
50mm f/1.4 made by Canon or Nikon.
* Great for isolating your subjects against a beautifully soft and blurry background.
* The most cost-effective way to capture tons of light.  Critically for anything indoors after sundown when you can't use lights.

Telephoto Zoom
70-200mm f/2.8
Perfect for keeping a more comfortable distance from your subjects when filming weddings.  Use a tripod when using this lens to keep your shots stable.

Wide Zoom
16-35mm f/2.8
An excellent wide-angle zoom to capture landscapes, or to pair with a GlideCam.

85mm f/1.8

Use Neutral Density filters during daylight hours

Video cameras are capturing much more light by shooting at a slow shutter speed (1/50th of a second, or 1/125 of a second for slow-motion), you can only get the exposure right by stopping down on your lens.  The problem with stopping down to f/8, f/11, or lower is that the image looks less cinematic and more like video coming from a consumer camcorder.  The more you can shoot between f/2.8 and f/5.6, the better.  Your shots will look more cinematic with beautifully blurred backgrounds.

Monday, December 15, 2014

Days of Heaven and Natural Light Cinematography

Days of Heaven (1978) was filmed almost entirely with natural light.  Here are some DVD freeze frames from the film to help study the placement of the subjects in relation to the light source.

Click an individual image to see a full-size version.

Learn more:
Four Lessons in Cinematography from Nestor Almendros | Filmmaker Magazine

Shooting Days of Heaven with Terrence Malick | A-BitterSweet-Life


Side light during the magic hour.

side light using the setting sun and capturing a golden glow (magic hour)

indoor scene, one of the only scenes in the film to use artificial light

Was probably filmed during sunset. This low angle is one of the only ones used in the film.


The beauty of natural light

interesting framing and juxtaposition showing the character and what he sees

Many of the film's scenes were shot during the magic hour and darker scenes were filmed after sunset.

Most likely late afternoon light, probably using a bounce card to fill in the actress' face naturally.


Thursday, December 11, 2014

The Top 10 Films that Influenced My Childhood

I was born in 1987.  As one of the oldest members of Generation Y, I do remember a time before everyone used the internet, had smart phones, and used social media.

These are the top 10 films that influenced my child hood.  I'm only counting films that I saw before age 12, as I feel that really encompasses that "magic years" of a person's childhood.

1. Return of the Jedi
My favorite Star Wars movie as a kid.  Now that I'm older, I appreciate Empire Strikes Back much more.  As a kid, Empire was dark, intense, and left the viewer with a heavy cliffhanger.


2. Aladdin
The music, the vocal talents of Robin Williams, and the epic animation still put this in my top 3 favorite Disney movies.


3. Raiders of the Lost Ark
I saw this by age 5 or 6.  The action scenes were captivating, the melting Nazis' faces scared the crap out of me, and I would sing and hum the music themes.


4. Back to the Future
One of my favorite adventure movies.  I could watch this over and over and still enjoy it.


5. Three Ninjas
My favorite actual kid movie during my childhood.  The antics, karate, and "wisdom" were great entertainment as a 6 or 7 year old.


Most kids who were in elementary school in the early 90's saw this movie.  Sadly it's been lost on the new generation of young kids.

6. The Three Musketeers
One of my favorite adventure movies as a kid.  I loved the swashbuckling adventure, comedy, Tim Curry as the villain, and the swordplay.


7. The Lion King
One of the quintessential Disney movies of the 90's.


8. The Rescuers Down Under
For it's time, much of the animation was groundbreaking and featured visual styles that were rare in Disney films.


9. Dances With Wolves
I loved the music, love story, sweeping landscapes, and the action sequences, even at a very young age. The movie really pulled at my heartstrings, and even as an adult, I feel a strong resonance with the morality tale and love story.


10. The Rocketeer


Top Films that shaped my budding love of filmmaking in adolescence:

1. The Matrix

2. Lord of the Rings: Fellowship of the Ring

3. The Patriot (1999)

Minority Report
Traffic
Gladiator
Good Will Hunting
Run Lola Run
Nowhere in Africa
The Bourne Identity
The Bourne Supremacy


Wednesday, December 10, 2014

Cinematography With Natural Light

Natural light can provide everything you need for exterior scenes, especially if you live in the Northern Hemisphere.  In places like Canada, and Montana, USA., the twilight hour is much longer than if you live further south.  This also means that the "golden hour" that provides cinematographers with beautiful, dramatic light is also longer.

The 1978 Terrance Malik film Days of Heaven was shot almost entirely with natural light.  The crew lit interior scenes and buildings with set lights, but the majority of their exterior scenes were filmed with natural light.  The Spanish cinematographer Nestor Almendros was often at odds with the Hollywood lighting crew because when the equipment truck was be opened, the lights were left behind.  Almendros went on to win Best Cinematography for 1979.

White bounce cards were used for fill light during some exterior scenes, but this is still a form of natural light.  Back lighting was also one of the key techniques used on Days of Heaven. 

Here are some examples of natural light taken during the golden hour. The first three images show light that is very similar to the look of many scenes in Days of Heaven.

Natural light at sunset in Paradise Valley, Montana.

Days of Heaven - lighting style


Sunset light in Livingston, Montana.


Dramatic natural light during a cloudy day, Bozeman, Montana


Sunset along a rural road, Bozeman, Montana


Friday, November 28, 2014

How to use C-Stands on your video productions


C-Stands are used for holding:

Lights
Reflectors
Flags (light blockers)
Microphones
Diffusion panels
Green screen

What to know about using C-Stands:

  • If you're extending your the arm on your C-Stand, be aware that you probably want sandbags to stabilize the stand to prevent lights or gear from falling on your actors or your set.
  • They are one of the most versatile pieces of grip equipment and most film industry professionals will recommend having your own if you do your own freelance video production.
  • Hold microphones without extra hands.  Suspending microphones should be relatively easy with C-Stands as long as you remember to bring long enough audio cables.
  •  Position reflectors.  Keep reflectors in the exact spot that you want them by attaching them with a clamp.
  • Suspend overhead lights.  Suspending softboxes or other lights above your talent (actors) can mean achieving the lighting setup that you want.

The Gritty, Cinema Verite Look of Black Swan


Momentum: Black Swan shot on Super 16mm, ARRI, Canon 7D & 1D mark IV

Planning shots with DSLR cameras:
I shot all of that rehearsal footage with the Canon 5D Mark II, which gave me references for the shots we wanted to make. I also figured out a lot of the mirror shots during prep, because we were rehearsing in a room with a three-sided mirror. 
~ Matthew Libatique, Cinematographer

Black Swan was a 40 day shoot.  The film is 108 minutes long.  The budget was $12 million and the film grossed $106 million in the U.S.  Total worldwide box office was $222 million.

On working with Director Darren Aronofsky:
A beautiful thing about working with Darren is that he has a visual style in mind, and he’s very clear about what he’s trying to do — there’s no coverage ambiguity. In fact, I wouldn’t even call what he does coverage. His style is more like the European style: you only have a few bites of the apple, so you make them all count.

How 16mm fit into the visual style of Black Swan
Darren likes 16mm because it’s small, he can do handheld, and he doesn’t have to wait around for camera setups. We were using real locations, so it helped in that regard, too. The apartment Nina shares with her mother was right next to Prospect Park, and we moved the camera in as though we were documenting real people’s lives. We made it a point to travel from kitchen to hallway to foyer to bedroom to bathroom, but the space really dictated the kinds of moves we could make. I think 16mm creates interesting texture, especially if you expose it correctly.


Matthew Libatique was nominated for best cinematography for Black Swan, but has also filmed:

Noah

Requiem for a Dream

Everything is Illuminated

The Fountain

Iron Man

Iron Man 2

Phone Booth

Inside Man


Saturday, November 15, 2014

Sriracha Documentary from Griffon Hammond


Griffon Hammond produced, filmed, and edited his own documentary about Sriracha sauce. Using a Kickstarter campaign, he raised $21,000 and his project goal was just $5,000. Over 1,300 people backed his project.

Griffon Hammond's Youtube Channel

Tuesday, October 28, 2014

Professional Quality Wedding Ceremony Audio Recording for $125


If you're not quite ready to invest the $600 needed to get a quality wireless lavalier system, consider a budget alternative that gets great sound, but will not empty your wallet.

Griffin Hammond (known from Indy Mogul on Youtube) is a professional videographer whose freelance work is about 25% weddings.  He captures professional quality audio of wedding ceremonies by placing the recorder with a lavalier attached into the groom's pocket.  This allows clean, distortion free audio capture of all the wedding vows.

He uses the older Tascam DR-08 that is almost identical in size and weight to the newer DR-05 model.


The Tascam DR-05 handheld audio recorder is only $100 on Amazon and B&H Photo.

The omnidirectional Azden EX-503 lavalier mic is just $23 at Amazon or B&H Photo.

I've used this Azden mic for almost all of my video interviews and it records clear, crisp audio for interviews and promo videos. The only time I couldn't use it was during a education demonstrations where I needed to monitor that the audio was in fact being recorded. Previously I would connect the lavalier mic to a Zoom H4n recorder and place the recorder on the lap of the person talking (or in their back pocket if they were standing).

The zoom is bulky and it was obvious that some the interview subjects were uncomfortable having the recorder bulging out of their pocket.

For controlled environments and indoor interviews, this combination is a great way to get solid audio quality for less than $200.

Without batteries, the DR-05 audio recorder weighs just 4 ounces.  With two AA's it weighs 6 ounces.  The Zoom H4n does not fit as well in a pocket and is a heavy 12 ounces with batteries installed.

Sunday, September 14, 2014

Typewriter Artist - inspiration in spirit and storytelling


Paul Smith is a man with Cerebral Palsy and creates incredible works of art, with only a typewriter.

Friday, September 5, 2014

How to Price Wedding Videography

Determine your pricing by the hourly rate you want to earn.  If you're just starting, you'll probably have to charge 50-60% of what a full-time professional charges for wedding videography.

Expect to spend about 40-60 hours editing the full-length wedding film, depending on if you provide a 40 minute or 60 minute finished video.  Expect to spend one hour per edited minute of video.

If you want to earn $40 per hour, then you need to charge $1,600 minimum for any wedding video.

Sample expenses and profit breakdown for wedding videography:

$2,000 earned for wedding video
- 400 (second videographer)
- 40 (rent an extra wireless mic)
- 50 (rent a 70-200mm zoom lens)
- 30 (purchase of a professional DVD case with cover art)
---------------------
$1,480 tentative profit

Also consider:
- Travel costs
- Housing/meal costs if the wedding is more than one hour away
- Batteries (shotgun mics often use 9V batteries, portable audio recorders usually use AA's)
- renting professional zoom lenses for the other videographer(s), depending on what equipment they have.

Monday, August 25, 2014

Get Better DSLR Footage for a Wedding Video

Editing your own footage will help you learn where you made mistakes and how to make your next shoot better.  If you don't edit your own footage, ask your editor to tag some clips that worked creatively, but could not be edited because of technical problems.

My first wedding shoot in Montana had some beautiful imagery, but shooting with a DSLR is not without it's challenges, and several shots had to be cut or trimmed because of soft focus or camera shake.

How to Make Your Next Wedding Video Better:

Get sharp focus
  • Use a larger monitor to quickly determine if your shot is in sharp focus. Several nice shots on my first wedding were cut because of focus problems.  If you've used a DSLR for more than 10 minutes of video, you'll know that it's hard to judge focus on a puny 3-inch monitor.  Expect to spend $400 or more for a good monitor that has 800 pixels high in resolution.
  • Have a focus pulling device to take your hand off the lens.  It's easy to ruin shots because you're shaking the camera when adjusting focus directly on the lens.
Today I ordered a simple focus control knob that will help to make focus adjustments faster and take my hand off the lens barrel.  It's only $16 and made from aluminum.  I'm curious to see how much easier (when combined with my new monitor) it makes to get sharp focus quickly.

Follow Focus handle by PS Productions.  $16 on Amazon.

After watching this review from learningDSLRvideo.com and checking prices on several 7-inch monitors, I ordered the Ikan VK7i 7" HDMI Monitor with the Canon E6 battery plate.  I also chose this monitor because I can buy extra camera batteries for my Canon 6D and they double as monitor batteries.

ikan VK7i 7" HD Monitor, about $450 including a battery and sunshade, from B&H.

Get more coverage with extra cameras (or shooters)
Shooting the ceremony with at least two cameras will allow you, as the main videographer to get some extra shots during the ceremony (ie: flowers, bridesmaids, groomsmen).  Extra shots during the ceremony will help you cut away during your wedding film and your wedding trailer.

Always be shooting
Capture the couple while they are doing their session with the photographer or ask for a few walks around the wedding location.

Camera movement
  • Rent or buy a slider to use at your next wedding.  My local camera store rents a slider for only $15 per day.  Trying a slider first will also help you to know what you want to buy.
  • Rent a GlideCam or Merlin to capture smooth, cinematic walking shots.

Record more audio
  • Get before or after audio from the bride and groom to use for voice over in your edited film and wedding trailer.
  • Get fun shots and spontaneous audio from the groomsmen


Friday, August 22, 2014

Where to Find Free Music for Your Video Productions

incompetech.com
Music Composer Kevin MacLeod has posted over 2,000 songs that are completely free for personal or commercial use.
* Be aware that credit must be given somewhere; in your video, or in the video description.  Youtube videos using his music can be monetized.
* Can search tracks by genre or feel.
* most of the music used on Indy Mogul videos comes from this site.

JoshWoodward.com
Musician who does vocal and instrumental versions of his songs.
* About 170 songs available.
* Can cut between vocal and instrumental version of the same track for your video editing.

FreeMusicArchive.org
* Make sure to do a search that includes a filter allow "commercial purposes" so you don't accidentally use music that cannot be used commercially
* Over 3,000 tracks

RoyaltyFreeKings.com
* Scroll down to the bottom to see the free music available.

NoizeIndex on SoundCloud
* Much of their music is available with the Creative Commons attribution license

TheMusicBed.com
Songs are $30-40.
Good selection for making wedding films, or promotional videography with a decent budget.

Most of the links and information on this post came from:
The Ultimate Guide To Royalty-Free Music For Youtube! - Friday 101 - YouTube

Get great video sound recording for $25


The Azden EX-503 Lavalier microphone produces excellent sound and is only $25.  You can get yours on B&H or at Amazon.com.

I discovered this mic after Griffin Hammond from Indy Mogul said that he used it on wedding video shoots.  His wedding films had great production value, so I was surprised to hear that a $25 microphone produced such good quality audio.  His trick was to stick a small audio recorder in the groom's pocket and connect the Azden lavalier mic.  This would capture great quality audio of the vows, which is critical for producing a professional level wedding film.

On my video interview shoots, I plug the Azden mic into a Zoom H4n recorder to capture the audio separately from the camera so I could better control the audio quality and avoid cables running from the video subject all the way to the camera.

See two videos below shot with the Azden EX-503:

Documentary style promo/interview recorded with the Azden mic

Montana Community non-profit promotional video

Monday, August 11, 2014

Nikon D810 is the first Canon/Nikon Nikon DSLR to shoot a1080p at 60 frames per second

Nikon's soon to be released D810 will be the first DSLR camera from Nikon or Canon to offer 1080p shooting at 60fps.  B&H has the camera available for pre-order at $3,297.  The D800 currently sells new for about $3,000.

There are already three Panasonic DSLR cameras that can shoot 1080p video @60fps, so why is the Nikon D810 camera an important update?  It signals that Nikon & Canon are adding useful and competitive video features to their DSLR cameras.  Canon and Nikon still dominate the DSLR market, and if they want to continue bringing video shooters into their fold, the video recording features need to match what Panasonic and Black Magic are offering with their cameras.

The Panasonic GH2, GH3, and GH4 are great cameras and do have advantages over Canon and Nikon DSLRs for video, but at this time it's not a smart purchase unless you want to invest an additional $2,000 in a new camera system.

Why I would not invest in Panasonic GH series cameras right now:
  • I already own all Canon equipment, so it does not make sense to buy a new camera system with lenses and batteries I cannot use on my existing Canon 6D DSLR.
  • They lack full-frame sensors and I'm also a photographer. I upgraded to the Canon 6D because of the full-frame sensor size.  All of the Panasonic DSLRs that shoot 1080 at 60fps, but their sensors are even smaller than the crop-size Nikon and Canon cameras.

The Four Thirds sensor size is noticeably smaller than the Nikon and Canon crop size sensors.

More information on the Nikon D810:

Nikon D810 - Wikipedia, the free encyclopedia

Nikon D810 Digital SLR 1542 Camera Body - Review Nikon D810 at B&H Photo

Follow focus

Follow focus marks are measured from the sensor to the area in the scene that requires sharp focus.  If you're focusing on an actor, their eyes should be sharp, since we look at the eyes.

Follow Focus Mark on a RED camera.


Measuring from the sensor mark to the actor's eye.
Dry erase follow focus marks numbered on the white strip next to the focus pulling knob.


A great DIY follow-focus option is to use a $5 silicone jar opener attached to your camera lens.  You can also use a dry-erase marker to label your focus points.  Via:  Follow Focus for Five Bucks by Film Riot on Youtube.

Saturday, August 9, 2014

Indy Video Lighting for $100 or less

Many low-budget and indy filmmakers like to build their own lighting setups.

With the wide availability and affordability of CFL lights, building your own lights is no longer a necessity since CFL bulbs are inexpensive for their comparative light output.

As of this writing (August 2014), the #1 selling continuous lighting kit on Amazon.com is a set of three 45watt CFL 6500K, Daylight Balanced bulbs with umbrellas and stands. This kit is only $47.95 and produces the equivalent of 600 watts of light output while only using 135 watts of energy.


Why use CFL bulbs for your indie lighting?
  • Cheap.  CFL's cannot be beat for their price and light output.
  • Will not produce excess heat.  CFL bulbs will keep your actors comfortable because produce very little heat and will allow you to take down/adjust your lights safer because they are mich cooler to the touch.
  • Small form factor.  Pack your whole lighting kit in a bag and maybe a small box to protect the bulbs.
  • Flexible.  Your bulbs can be swapped out for higher or lower light output.
CFL to incandescent equivalents for video lighting:
45w = 200 watts
85w = 300 watts
105w = 400 watts

The lighting kit I just ordered is the Cowboy Studio Softbox Lighting Kit, 600 watt output.  I chose this kit because it was inexpensive at $76, provides a 5500k daylight balanced light source, and includes softboxes with stands, which are generally more useful than umbrellas for video lighting.


If the two 85 watt bulbs (300 watt incandescent equivalent) provided in the kit do not provide enough light for my video setups, I can simply purchase standalone 105 watt bulbs from Cowboy Studio or LimoStudio to bump my 600 watt lighting kit to 800 watts for $30 or less.


Great Videos on Indy Lighting

How-to: Powerful DIY video light (800 watt equivalent) - YouTube (March 2012)

$60 DIY video light created by Griffon Hammon from Indy Mogul

85 watt CFL bulb provides 300 watts of traditional light.  Indy Mogul uses this for some videos.
Three Point Lighting example from Indy Mogul.
Color temperature scale.  5,000k balanced lights mix well with sunlight.


Setting up your lights/precautions
  • Screw in your CFL bulbs by the base to avoid breaking them and releasing mercury vapors
  • Know how to dispose of CFL bulbs in your area in case you break a bulb.

Standalone CFL Light Bulbs to expand your lighting kit:

LimoStudio 2 x Photo Studio Photography 105 Watt 6500K Day Light Fluorescent Full Spectrum Bulb - $18.46

LimoStudio Set of Two 105 Watt, 6500 K Fluorescent Daylight Balanced Light Bulb for Photography and Video Lighting, AGG878 - $28.50

CowboyStudio Set of Two 105 Watt, 5000 K Fluorescent Daylight Balanced Light Bulb for Photography and Video Lighting - $29.25

If need a 1K light (1000 watt) equivalent, here is one for less than $100:
StudioPRO 1000W Photo Studio Continuous Portrait Video Lighting Kit with Light Stand, Five 45W Daylight Bulbs, and Softbox - $71.95
-- this kit has five individual on/off switches for each of the light sockets.


Thursday, July 17, 2014

Video Editing Desktop hardware

In April 2014 I purchased a custom-configured PC desktop from iBuyPower.com

At the time this configuration cost $1,400 and was just enough to avoid paying $75 shipping.
(No monitor included.)

Processor: AMD FX-8320 CPU (8x 3.50GHz/8MB L3 Cache)
8-Core Processor

Memory: 16 GB [8 GB x2] DDR3-1600

Video Card: NVIDIA GeForce GTX 760 - 2GB

Motherboard: ASRock 990FX Extreme9 -- AMD 990FX w/ 4x PCI-E 2.0 x16, 2x eSATA3, 8x USB 3.0

Main hard drive: 120 GB ADATA S510 SSD -- Read: 550MB/s, Write: 510MB/s

Data hard drive: 2 TB WD Black HARD DRIVE -- 64M Cache, 7200rpm, 6.0Gb/s

Optical drive: 14x Blu-Ray LG BLU-RAY Re-Writer, DVD±R/±RW Burner

2nd optical drive: 24x Dual Format/Double Layer DVD±R/±RW + CD-R/RW Drive

Power Supply: 600 Watt - OCZ ModXStream Pro 600W

The motherboard was one of only two available that supported up to 64GB of RAM for future upgrades, the other motherboards only supported 32GB of RAM. The other motherboard that supported 64GB of RAM was the ASRock Fatal1ty 990FX Killer.

This motherboard also supported dual graphics cards.  This means that three graphics cards can used.  If you're editing compressed HD footage (what Digital SLR's produce) or doing work in Adobe After Effects, a second graphics card can be a godsend.

To make video editing easier, I bought a ViewSonic VX2703MH-LED 27-Inch LED Monitor on Amazon for $240. The 27 inch screen size works well on my desk and also gives me a second monitor to use with my MacBook Pro when doing website development.

Future upgradability with this system:

  • Boost the RAM up to 64GB (I bought 16GB to start)
  • Add another video card (bought a 2GB card with my system)
  • Can upgrade my main hard drive drive to a higher capacity Solid State Drive.
  • Can add an additional hard drive for data or backup. 
  • Can buy a second monitor for video and photo editing.

Friday, June 27, 2014

DSLR Video Specs Comparison - framerates, maximum recording times, and price

Camera Price Max. recording time 60fps Max video ISO other battery
Panasonic GH3 $1,000-1,100 240 min. 1080p 6400 audio monitor
Panasonic GH2 $500-600 used 720p
Canon 6D $1,700 30 min. 720p 12800 full-frame,
wi-fi
LP-E6
Canon 70D $1,200 30 min. 720p tap AF LP-E6
Canon 60D $700 12 min. 720p 6400


Panasonic GH3 Review - Video
All video specs for the camera.

The GH3 has a special heat-dispersing design to enable longer recording times (overheating while recording video was a issue that plagued earlier HD-DSLRs like the 5D Mark II and 7D)

Uncompressed, clean HDMI output for use with an external capture device or monitor.


Sunday, June 22, 2014

First Wedding Videography Shoot with a DSLR

On Saturday, June 21st I filmed my first wedding with a DSLR.  Though I've filmed several other projects with my Canon 6D camera, there are many challenges of shooting run-and-gun with a DSLR during a wedding.

Creativity
  • Use your foreground.  Some of my favorite shots of the day utilized foreground elements.
  • Keep moving.  Move around and get different angles.  If people are doing a continuous or repetitive action,  move yourself to get extra angles for editing.
  • Keep extra shots to 10-15 seconds.  The ceremony is about the only "shot" that should be continuous.  Challenge yourself to film each shot for only 10-15 seconds.  Imagine editing the movie in your head; what do you see?
  • Find the Happiness.  Look for smiles, laughs, and fun.  Those moments will look great when cutting your wedding film.  They can be used as great visual material for toast speeches, interviews, and voice over.
  • Get variety.  Keep looking for something unique.  What special touches have been added to the wedding that you may have missed?
  • Film a few things in slow-motion.  The groomsmen being guys, the bouquet toss, the bride and groom walking together.
  • Move the camera.  Unless your shot must be static, move the camera to bring life to your shots.
  • Rack focus.  Switching your objects in focus can be great for both the bride and the groom and for shots of still objects.
  • Capture ambient sound.  Many professional wedding films capture ambient sounds of birds, pets, children, and people talking. These can be great segways between shots and help to breathe more life (and production value) into your finished piece.

What I learned:
  • A Monopod is a must.  Unless you have two cameras rolling, you probably will not need a regular tripod.  A tripod is too bulky to safely and easily move around weddings guests.  Using a $15 rented monopod made great shots easier and allowed me to be versatile.
  • An on-camera monitor may get in your way.  I rented a 7" monitor but opted not to use it because my setup did not support a shotgun mic and monitor together.  It rained during the last two hours of coverage and the rain could have fried the monitor.
  • Use a second camera. Borrow, beg, or rent.  Capture the opposite angle of the ceremony with your second camera.  If you're actively filming the bride with the main camera, setup the second camera on a tripod to film the groom, or vice versa.  If you can borrow a camera, you'll save a significant amount of money renting.  In Montana a Canon 7D rents for $70 per day and a 5D Mark III is $149/day.  Ask a friend to borrow their camera or offer them $50 to use their camera for a day and I bet they will not turn you down!
  • Prepare for bad weather (rain).  No matter your DSLR setup, rain could quickly halt your ability to capture good footage.
  • Bring your charger and three batteries.  My first battery was not fully charged and only lasted for a few hours. If I had forgotten to bring my charger, it's likely I would have run out of battery power before the action was over.
  • Plug an audio recorder into the DJ's soundboard.  If you're not able to mic-up the groom with a hidden lavalier mic, connecting to the soundboard is a must.  You'll probably get good audio and at least have a backup if your on-camera shotgun mic is not picking up what you need.

Here's the gear that I used:

Canon 6D
Canon 24-105 lens
Rode VideoMic Pro
Zoom H4n (plugged into the DJ's sound board)
Sirui monopod P-324x with Benro S4 head (rented)
Two camera batteries
Battery charger
Umbrella
7" LCD monitor (rented and not used)


Wednesday, May 21, 2014

Gear list and checklist for DSLR film shoot

After a handful of shoots, here is my checklist for gear when prepping my DSLR for a shoot.  At this point I've done three outdoor shoots and four indoor shoots.

Main gear
  • Camera
  • Lens(es)
  • Video tripod(s)
  • ND filters
  • External audio recorder
  • Mics 
  • Monitor
  • SDHC Memory cards (empty and formatted in-camera)
  • Boom Pole
  • Boom/Reflector holder
  • Shoulder mount
  • AA batteries
  • 9-volt battery (if using Rode VideoMic)
  • AC Adapter for camera (if you own one)
  • Headphones
  • Air blower
  • AC adapter for External audio recorder
  • AC adapter for second camera
Miscellaneous tools
  • Gaffer tape / artists' tape
  • Surge protector
  • Extension cords
  • Notebook
  • Pen and pencil
  • Water bottle
  • Protein bars
  • Sack lunch
  • Pillow/foam pad for comfort
Gear prep checklist
  • Charge batteries
  • Dump / backup / format memory cards
  • Blow dust/debris off of lens filters
  • Pick-up rental equipment

Monday, May 19, 2014

Transferring MiniDV footage to Adobe Premiere, like the days of old


To film a live presentation last week I borrowed a semi-pro camcorder that used MiniDV tapes. Coming from the Digital SLR world, the whole concept of recording to tape was a new beast to tame.

I had to figure out how to transfer to footage like people did before 2008 when tapes were still the main storage format for digital footage. Filming with SLR cameras was a still thing of the future.

Here’s how I learned how to get the MiniDV footage off of the camcorder tapes and into Adobe Premiere CS6.

How to Capture Footage In Adobe Premiere cs5 Mini DV/Tape Deck Tutorial - YouTube
(6 minutes)

Create a new project.
When setting up the project, there is a capture option, and you’ll want to choose DV or HDV. (DV is standard definition video, HDV is high definition video.)


Choose your footage preset
In the preset window, choose the right preset for your camera. There are preset folders for DV and HDV.


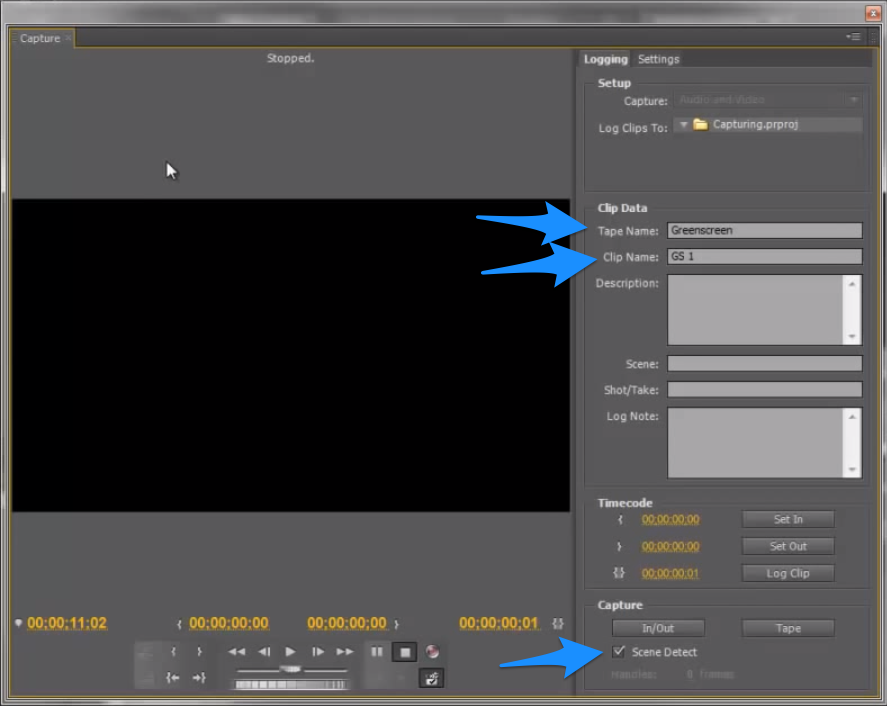
After the sequence is opened in Premiere, go to File > Capture.


Log your footage with the Tape name and Clip Name (see blue arrows in the screenshot above).

The “Scene Detect” option (checkbox near the bottom) can detect when you stopped and started recording on the camera and can make automatic clip segments.

If you need to change your settings before recording footage, click on the settings tab near the top.


Before recording, ensure that you camcorder is set to output the format that you would like, DV or HDV.  Here's a sample page from a Sony Handycam camcorder manual on how to set DV or HDV to output on the iLink (firewire) connection.


Press the red Record button when ready.

Most cameras will not show playback in the capture window, but you will be able to see the footage playing back on the camcorder while recording in Premiere.

Hit the Stop button when done capturing.

Photos via:
How to transfer DV to Laptop without having a Firewire port - YouTube
How to Capture Footage In Adobe Premiere cs5 Mini DV/Tape Deck Tutorial - YouTube