Friday, June 27, 2014

DSLR Video Specs Comparison - framerates, maximum recording times, and price

Camera Price Max. recording time 60fps Max video ISO other battery
Panasonic GH3 $1,000-1,100 240 min. 1080p 6400 audio monitor
Panasonic GH2 $500-600 used 720p
Canon 6D $1,700 30 min. 720p 12800 full-frame,
wi-fi
LP-E6
Canon 70D $1,200 30 min. 720p tap AF LP-E6
Canon 60D $700 12 min. 720p 6400


Panasonic GH3 Review - Video
All video specs for the camera.

The GH3 has a special heat-dispersing design to enable longer recording times (overheating while recording video was a issue that plagued earlier HD-DSLRs like the 5D Mark II and 7D)

Uncompressed, clean HDMI output for use with an external capture device or monitor.


Sunday, June 22, 2014

First Wedding Videography Shoot with a DSLR

On Saturday, June 21st I filmed my first wedding with a DSLR.  Though I've filmed several other projects with my Canon 6D camera, there are many challenges of shooting run-and-gun with a DSLR during a wedding.

Creativity
  • Use your foreground.  Some of my favorite shots of the day utilized foreground elements.
  • Keep moving.  Move around and get different angles.  If people are doing a continuous or repetitive action,  move yourself to get extra angles for editing.
  • Keep extra shots to 10-15 seconds.  The ceremony is about the only "shot" that should be continuous.  Challenge yourself to film each shot for only 10-15 seconds.  Imagine editing the movie in your head; what do you see?
  • Find the Happiness.  Look for smiles, laughs, and fun.  Those moments will look great when cutting your wedding film.  They can be used as great visual material for toast speeches, interviews, and voice over.
  • Get variety.  Keep looking for something unique.  What special touches have been added to the wedding that you may have missed?
  • Film a few things in slow-motion.  The groomsmen being guys, the bouquet toss, the bride and groom walking together.
  • Move the camera.  Unless your shot must be static, move the camera to bring life to your shots.
  • Rack focus.  Switching your objects in focus can be great for both the bride and the groom and for shots of still objects.
  • Capture ambient sound.  Many professional wedding films capture ambient sounds of birds, pets, children, and people talking. These can be great segways between shots and help to breathe more life (and production value) into your finished piece.

What I learned:
  • A Monopod is a must.  Unless you have two cameras rolling, you probably will not need a regular tripod.  A tripod is too bulky to safely and easily move around weddings guests.  Using a $15 rented monopod made great shots easier and allowed me to be versatile.
  • An on-camera monitor may get in your way.  I rented a 7" monitor but opted not to use it because my setup did not support a shotgun mic and monitor together.  It rained during the last two hours of coverage and the rain could have fried the monitor.
  • Use a second camera. Borrow, beg, or rent.  Capture the opposite angle of the ceremony with your second camera.  If you're actively filming the bride with the main camera, setup the second camera on a tripod to film the groom, or vice versa.  If you can borrow a camera, you'll save a significant amount of money renting.  In Montana a Canon 7D rents for $70 per day and a 5D Mark III is $149/day.  Ask a friend to borrow their camera or offer them $50 to use their camera for a day and I bet they will not turn you down!
  • Prepare for bad weather (rain).  No matter your DSLR setup, rain could quickly halt your ability to capture good footage.
  • Bring your charger and three batteries.  My first battery was not fully charged and only lasted for a few hours. If I had forgotten to bring my charger, it's likely I would have run out of battery power before the action was over.
  • Plug an audio recorder into the DJ's soundboard.  If you're not able to mic-up the groom with a hidden lavalier mic, connecting to the soundboard is a must.  You'll probably get good audio and at least have a backup if your on-camera shotgun mic is not picking up what you need.

Here's the gear that I used:

Canon 6D
Canon 24-105 lens
Rode VideoMic Pro
Zoom H4n (plugged into the DJ's sound board)
Sirui monopod P-324x with Benro S4 head (rented)
Two camera batteries
Battery charger
Umbrella
7" LCD monitor (rented and not used)


Wednesday, May 21, 2014

Gear list and checklist for DSLR film shoot

After a handful of shoots, here is my checklist for gear when prepping my DSLR for a shoot.  At this point I've done three outdoor shoots and four indoor shoots.

Main gear
  • Camera
  • Lens(es)
  • Video tripod(s)
  • ND filters
  • External audio recorder
  • Mics 
  • Monitor
  • SDHC Memory cards (empty and formatted in-camera)
  • Boom Pole
  • Boom/Reflector holder
  • Shoulder mount
  • AA batteries
  • 9-volt battery (if using Rode VideoMic)
  • AC Adapter for camera (if you own one)
  • Headphones
  • Air blower
  • AC adapter for External audio recorder
  • AC adapter for second camera
Miscellaneous tools
  • Gaffer tape / artists' tape
  • Surge protector
  • Extension cords
  • Notebook
  • Pen and pencil
  • Water bottle
  • Protein bars
  • Sack lunch
  • Pillow/foam pad for comfort
Gear prep checklist
  • Charge batteries
  • Dump / backup / format memory cards
  • Blow dust/debris off of lens filters
  • Pick-up rental equipment

Monday, May 19, 2014

Transferring MiniDV footage to Adobe Premiere, like the days of old


To film a live presentation last week I borrowed a semi-pro camcorder that used MiniDV tapes. Coming from the Digital SLR world, the whole concept of recording to tape was a new beast to tame.

I had to figure out how to transfer to footage like people did before 2008 when tapes were still the main storage format for digital footage. Filming with SLR cameras was a still thing of the future.

Here’s how I learned how to get the MiniDV footage off of the camcorder tapes and into Adobe Premiere CS6.

How to Capture Footage In Adobe Premiere cs5 Mini DV/Tape Deck Tutorial - YouTube
(6 minutes)

Create a new project.
When setting up the project, there is a capture option, and you’ll want to choose DV or HDV. (DV is standard definition video, HDV is high definition video.)


Choose your footage preset
In the preset window, choose the right preset for your camera. There are preset folders for DV and HDV.


After the sequence is opened in Premiere, go to File > Capture.


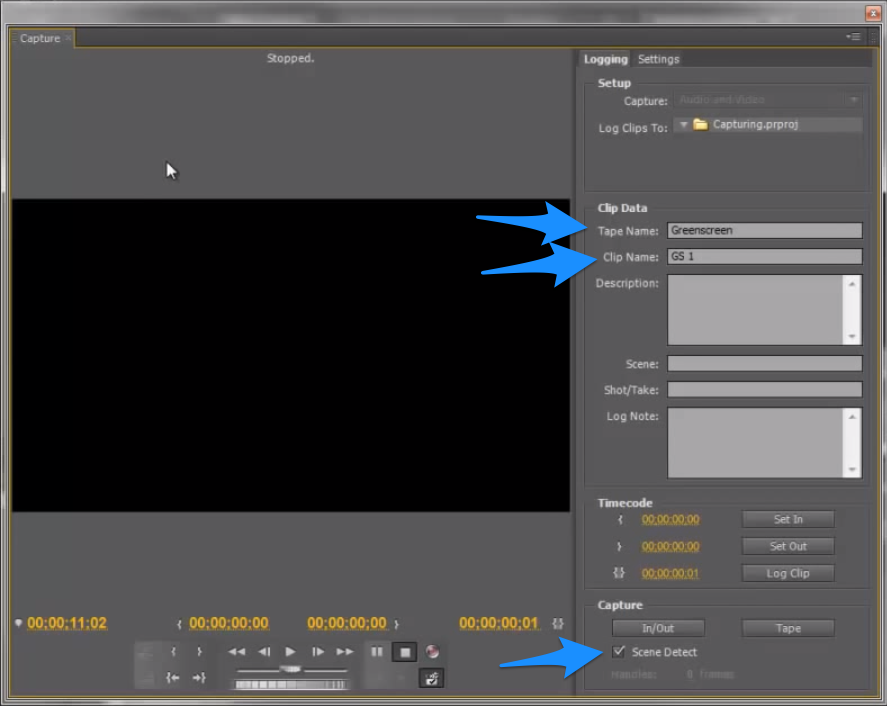
Log your footage with the Tape name and Clip Name (see blue arrows in the screenshot above).

The “Scene Detect” option (checkbox near the bottom) can detect when you stopped and started recording on the camera and can make automatic clip segments.

If you need to change your settings before recording footage, click on the settings tab near the top.


Before recording, ensure that you camcorder is set to output the format that you would like, DV or HDV.  Here's a sample page from a Sony Handycam camcorder manual on how to set DV or HDV to output on the iLink (firewire) connection.


Press the red Record button when ready.

Most cameras will not show playback in the capture window, but you will be able to see the footage playing back on the camcorder while recording in Premiere.

Hit the Stop button when done capturing.

Photos via:
How to transfer DV to Laptop without having a Firewire port - YouTube
How to Capture Footage In Adobe Premiere cs5 Mini DV/Tape Deck Tutorial - YouTube

Sunday, May 4, 2014

What Gear to Buy First

Camera
If you're just starting and have no money to invest in a camera, borrow or rent until you can buy.   Renting is expensive, though, as you'll probably pay $80-150 per day for a current DSLR model.
Suggested models: Canon 6D [full frame], Canon 70D [touchscreen autofocus], Panasonic GH3 [1080p at 60fps], Panasonic GH4 [4k], Nikon D610, Nikon D7100,
Your lenses and other gear (lighting, camera support, etc) will make your project look better, so don't blow your entire budget on the camera.

Note: As of April 2014, only a few DSLR cameras can shoot full 1080p at 60 frames per second.  In the next 2-3 years, many more models will arrive to fill this feature gap.  If you plan to do lots of slow-motion, best to get a camera that shoots full 1080p at 60 fps.

50mm lens
Even the cheaper, 50mm f/1.8 from Canon or Nikon is one of the fastest lenses you can buy for the money (less than $150).  If you can pony up the extra dough for the 50mm f/1.4, you'll get better build quality, faster focusing, and a little more light into the camera. [$399 for Canon or $334 Nikon D/$430 for Nikon AF-S]

Tripod
Having a stable camera will make your shots better instantly, and will be required for any interviews and most indoor shoots.  Panning and tilting with a video tripod can add a professional touch to the right shots.

External Mic
Onboard sound on DSLRs will leave you sorely disaappointed.  It's critical to use an external mic to capture good sound.  Good sound can set your video apart as professional when other people are recording poor sound.

External sound recorder
Even when using an external mic, bypassing the sound on board your DSLR has many, many benefits.  External recorders will let you record at broadcast quality formats, let you adjust the input level during recording,  allow multiple mics, and let you record ambient sound without shooting video.

Now that you have your basics covered, here's what you may need next for video production:

ND Filters
You can buy one variable ND filter, or buy a few filters. Neutral density filters will allow you to shoot get shots with shallow depth of field during bright sunlight.  Without an ND filter on a sunny day, too much light will enter your camera and you'll be forced to stop your lens down to f/8-f/16 to get proper exposure.

Shoulder Mount
A must for extended outdoor shoots.  Great for wedding videography, video journalism, and events.  They're relatively inexpensive if you start with a basic model.

Viewfinder
Will enable you to shoot in bright daylight and actually see your LCD screen to check exposure and focus.
Onboard Monitor
When shooting for a commercial production, a monitor is a must to check focus and allow your creative team to help make decisions

Camera Stabilizer
Steadicam style shots can add an impressive look to your reels if you get things right.

Camera slider
Those sleek horizontal motion shots you see now in promotional videos and wedding videography are done with sliders.  They can be expensive, but if you only need basic functionality, they are available for about $200.

Additional items to help with production

Reflector
A white reflector can help balance shadows during outdoor shoots or bring beautiful, natural light for your indoor shots.

Boom / Reflector / Light holder
A must have if you are a one or even two-man crew.

AC Adapter
Very helpful for indoor shoots so you don't have to worry about having too many batteries.


Helpful accessories

Batteries
Always carry at least one extra battery with you.  Most professionals will have three or four batteries, depending on how many camera bodies they have.


What to rent until you can afford to buy:

Lights
(or use poor man's utility lights)

Wireless lavalier mic
The model recommended to me retails for about $600.

Sunday, April 6, 2014

Feature Films shot on Canon and Nikon DSLRs


Wilfred is being filmed with a Nikon D800 and and old-school 50mm f/1.2 lens for a stylized shallow depth of field look.

The indie movie ($250,000 budget) Like Crazy was filmed entirely with a Canon 7D camera


Use Windows NTFS External Hard Drives on a Mac


Exchanging large files between Macs and PCs has been a royal pain in the rear for several years now.  If you're a mac user, you're bound to encounter an external hard drive in the Windows NTFS format that needs to have files added from a Mac.  This is not possible without special software to add a NTFS driver on your Mac so that you can write (add files) to the drive.

This week I needed to copy 300GB+ of files from a Mac-formatted HFS+ external hard drive to a client's NTFS formatted backup drive, and here's are the best options I found after a little research.

Paragon NTFS for Mac OS X software ($20)
* supports OS X 10.9 Mavericks
* 10 day trial available, or available on TPB.

Tuxera NTFS for Mac | Tuxera ($31)
* Supports 10.4 Tiger and later
* stable version: Tuxera NTFS for Mac 2013.2 (Latest update: 2013-10-23).
* Latest version supports OS X 10.9 Mavericks
* 15 trial, or latest version is available on TPB.
* Personal license can be used on all your computers.

Paragon Mini-Bundle! for $29.99 - 70% off - MacUpdate Promo
** Promo ends Monday, April 7th at 10pm MST.
** Same cost as the 2-in-1 bundle below, but you get more.
NTFS for Mac ($20 value)
HFS+ for Windows ($20 value)
Camptune X ($20 value)
ExtFS for Mac ($40 value)

usb - Alternative to Tuxera NTFS and MacFUSE? - Ask Different
Includes steps to achieve NTFS support on your mac with free software.

Paragon software is offering a 25% off deal through April 30th, 2014.  If you work with Macs and PCs in your home studio or work environment, this bundle is a complete solution for external hard drive support between Mac HFS+ and NTFS (Windows).  This means you're not stuck if you're a Mac user and someone gives you a PC drive with files you need.  PC Users, this means that when that special Mac person gives you a drive, Windows can actually read and write to that hard drive.
If you have a Seagate external hard drive, this NTFS driver is free:
NTFS Driver for Mac OS | Seagate


Read more about writing to NTFS drives on your mac:

How to write to a NTFS volume (Windows) from your Mac | IT Gems
If you use an older mac, this will probably be helpful.  The MacFUSE software listed here is not longer being maintained.